How to use Montel Alert and how to set up an alert?
The Montel Alert is a handy feature if you want to monitor specific contracts and be notified when any changes occur. This article explains how to create and link a Montel Account, How to create an Alert, and how to integrate it with Montel Online.
Montel Alerts Tutorial from Montel Group on Vimeo.
With the launch of Montel Alert, we also introduce the new Montel Account, which is a new type of user identity that will be used to sign into all of Montel's platforms in the future. To use the new Alert system, you need to create a Montel account.
1. Create a Montel Account:
To create a Montel Account, go to: https://alert.montelnews.com and click on "Create an account" then fill in the required fields.
Please NOTE that the email you register will both be used as your alert username and where you receive notifications. Providing your phone number is optional, however, in the future, we intend to offer notifications via SMS. For this function to work, the phone number must be correct.
2. Link your Montel Account to your Montel Online:
Once you are inside, you will be asked to link your Montel Account to an existing Montel Online user. To do this, click on “Settings” on the left menu, and press the “Link Accounts” button. This will give your Montel Account access to the same sources as your existing Montel Online user. Once you press the button, you will be redirected to montelnews.com. Log in with your Montel Online user, if prompted, and press the “Link to a Montel Account user” button.

Once this is done you can start using Montel Alerts!
3. Create an Alert:
To add an alert, click on “Alerts” on the left menu. This will take you to the Alert page. Here you can see all your active Alerts and Add, Edit, or Remove Alerts. To create a new Alert, press the “Add” button. This will take you to the create a new Alert page.

Name: This is the display name of the Alert.
Front symbol: This is the symbol of the contract you wish to monitor. We have supplied some common symbols for you to use, but you are not limited to these. You can also use Montel Online to find your front symbols, more information below.
Terms of alert: For more detailed alerts you can add one or more terms. Terms lets you select one or more properties to monitor. When Terms is empty, you will be notified of any change to a monitored contract. When more than one term is created, you need to select a Logical Operator (see below).
Logical operator: If you have more than one term, you need to choose how to evaluate the Alert. If the logical operator is “Or”, the Alert will trigger if any of the terms are fulfilled. If the logical operator is “And”, the alert will trigger if all the terms are fulfilled.
Period: The lifetime of the Alert. The default setting is that the Alert is active immediately and will remain active indefinitely. To limit the active period of an Alert, set the start time and time to the desired values.
Channels: Here you specify where to receive notifications. You can choose any combination of Mobile (the Mobile Notifier app), Email, and Web. At least one must be chosen.
Active: Checks if the alert is active. This is checked by default when creating a new Alert.
Description: Optional. Here you can set a message to accompany the notification. The “Generate description” button will add a small text based on the parameters selected on the alert. The description field can be empty, auto-generated, custom, or a combination of the latter two.
4. Integrate to Montel Online:
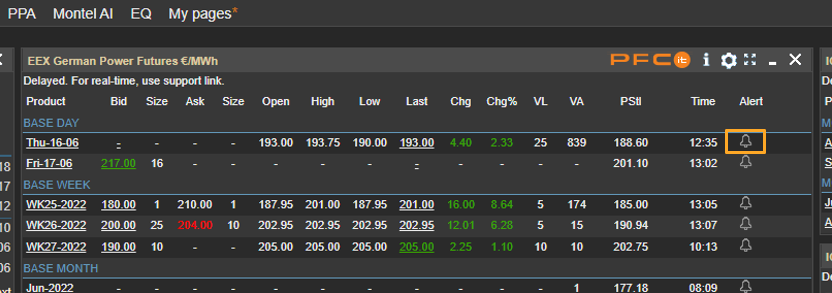
To create an Alert directly from Montel Online, you first have to enable the Alert column in the exchange overview.
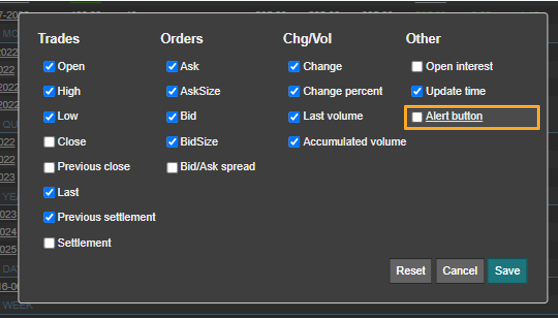
Press the preference button: 

Check the Alert button and save changes:

When you press the Bell button you will be sent to the “Add Alert” page, with the corresponding front symbol filled in.

![Montel_logo_pine_300ppi (1).png]](https://support.montel.energy/hs-fs/hubfs/Montel_logo_pine_300ppi%20(1).png?height=50&name=Montel_logo_pine_300ppi%20(1).png)